
Find yourself cramming the night before your exam, only to forget everything the next day? Study guides can help you organize your thoughts and the topics you need to tackle one by one. You don’t have to stay up all night anymore. A good study guide can transform how you approach your study time.
What Are Study Guides and Why Are They Important?
A study guide is a tool designed to help students review and understand course material. Instead of a scattered collection of notes and textbook pages, a study guide helps you collect the most important content, presented in a clear, concise way, making it easier to study multiple chapters or units at once.
Some key aspects of study guides include:
- They help condense complex information.
- They make it easier to grasp main ideas and see relationships between topics.
- They include a clear outline of the subject matter, key concepts, definitions, examples, practice questions, and summaries.
- You can customize a study guide to fit your unique learning style and studying routine.
- Creating a study guide encourages you to review notes and interact with the material. This helps you remember the information when you take tests.
- Study guides can be a powerful tool for students to build relationships with classmates by combining notes and resources.
Key elements of a study guide
An optimal study guide should be visually appealing, informative, and tailored to your learning style. It should also be well-organized and easy to navigate. Let’s explore some key elements, using the below pollution control study guide that I made with our AI study guide maker as an example.
Clear Structure and Organization
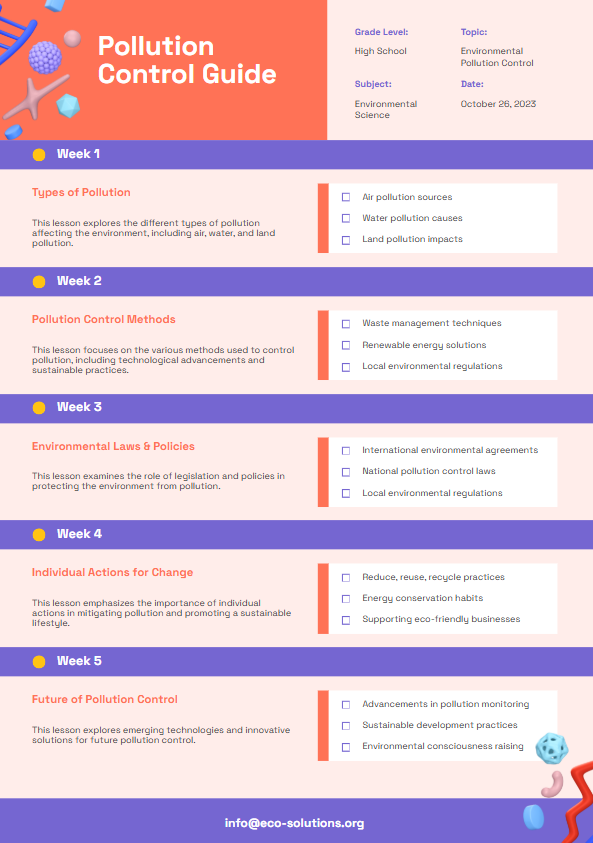
A well-defined structure is key to an effective study guide. The pollution control guide uses a chronological structure, organizing content by week.
For example, “Week 1” focuses on “Types of Pollution,” while “Week 2” delves into “Pollution Control Methods.” You can structure your study guide in a way that makes sense to you, whether chronologically, by topic, by week, or by date.
The study guide example also uses clear headings and subheadings to break the guide into sections, making it easy to navigate.
Summary of the Content
A good study guide includes a summary of the main ideas. This helps jog your memory and focus on the big concepts.
Key Concepts and Ideas
A study guide needs to focus on key themes. The pollution control guide breaks down each week into key concepts.
For example, in Week 2 under “Pollution Control Methods”, the study guide lists key themes that we’d need to remember for those core ideas.
Visual Elements
Visual aids go a long way to make your study guide more engaging. In our pollution control guide, we opted for colour-coding, with different colors for each week’s sections.
It’s easier to remember due to the icons and overall layout. You can also incorporate diagrams, charts, timelines, concept maps, and workflow diagrams to present your information in a visual way. You can also use process maps and to clarify complex procedures.
Just remember that while visual elements can make a study guide more visually appealing, too much of a good thing can spoil it. Try not to overwhelm your study guide with too many icons or diagrams.
Key Terms, Equations, and People
Include a dedicated section for important information. In the pollution control example, each key concept can be considered a key term that is described in the accompanying lesson. If you are studying the sciences, you can include sample problems with clearly labeled steps to solve them.
You can add notes on the contributions of relevant historical figures.
Sample Questions
You need sample questions to check your understanding of the material. While the pollution control guide doesn’t include sample questions, this section can be enhanced by adding a quiz section that includes multiple choice, true/false, or short essay questions.
We included questions as prompts to help us remember key facts or emulate key exam questions, as shown under “Types of Pollution” for Week 1.
Personalisation
It’s tempting to mold your study guide to one that looks like your friend’s (especially if they’re getting high grades). But it’s important that you adapt your study guide to fit how you learn.
If you are a visual learner, add more charts and diagrams, or if you are an auditory learner, consider a podcast.
Flexibility
As you learn, you might need to adjust your study guide as you learn new information, or you might discover new ways of organizing information.
While our pollution control guide is broken up into clear sections for each week, you can modify the order of the weeks to fit your learning needs, or even combine them.
Three Steps to Create a Study Guide Effectively
Creating an effective study guide involves a few key steps.
1. Gather and Organise Course Materials
The first step in creating a study guide is to gather all your course materials. You want to collect all your class notes, textbooks, handouts, and other relevant materials, ensuring you have a comprehensive overview of the content you need to review.
Many of us take notes but forget to look over them. Ensure you make time to review your notes so you can fill in any gaps you might have. Organizing your notes by date, topic, or in a way that makes sense to you is an essential way to prepare to create an outline.
As you go through your notes and textbook, highlight key concepts, definitions, and examples as you go along to set the stage for creating your summary notes. Using sticky notes or page flags to mark important information can also be quite useful.
Finally, be sure to summarize each chapter, focusing on the big ideas and incorporating any feedback you’ve received from assignments to pinpoint areas that need extra attention.
2. Identify Key Concepts and Themes
Once you’ve gathered your materials, analyze them to extract the most important information. Review your textbooks, notes, and assignments, looking for recurring topics, bolded or italicized words, and concepts your teacher emphasized.
Create a list of key ideas and group them into larger categories to understand how different topics connect. Prioritize these concepts to help narrow the focus of your study guide. Then, choose the best format for the content you are studying—outlines, concept maps, timelines, or flashcards are all popular options.
You might consider using visual aids like charts, graphs, or diagrams to enhance comprehension. Include practice questions to test your knowledge, and if relevant, add a vocabulary section with key terms and definitions.
3. Create an Effective Layout
The final step is to create an effective layout for your study guide. Choose a format that suits your learning style, whether it’s an outline, mind map, or flashcards. You can incorporate visual elements, using color-coding to highlight important terms or to separate different topics.
Determine if you prefer a digital or handwritten study guide, keeping in mind that digital guides are easier to share while handwritten notes may improve memory. Create a summary sheet to condense the key information.
How to Organize Your Study Guide Layout
An effective study guide layout is visually appealing, informative, well-organized, and easy to navigate, But most of all, the best study guide is tailored to you and your learning style.
That being said, there are some tried and tested layouts you can use as a template to get started.
Summary Sheets
This format offers a structured way to review material. By dividing a page into two columns, you create a direct relationship between the material and its application. The right side of the page is reserved for the main ideas, key concepts, and concise summaries of the content. On the left side, you would include related questions that prompt you to engage with the material actively.
This approach not only helps with recall but also encourages you to think critically about the connections between various elements of the content. The structured layout supports a thorough review and promotes active learning.
Cornell Method

Similar to a summary sheet, the Cornell method provides a structured approach to note-taking and review.
A single A4 page is divided into sections. A larger section on the right side of the page is used for capturing detailed notes during a lecture or while reading. A smaller cue column is on the left, which can be used to record questions, keywords, or main ideas from the notes on the right.
When reviewing, covering the right-hand section and using the cues on the left to prompt recall is an effective active recall strategy.
Concept Maps
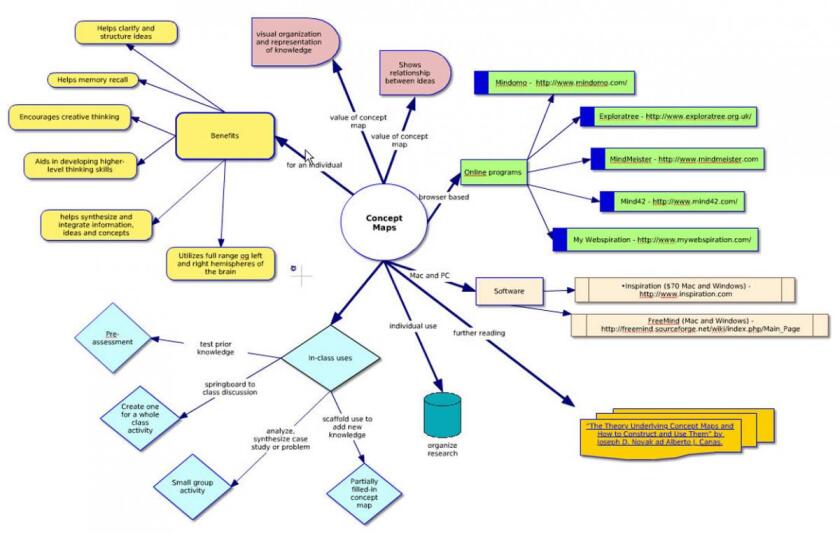
Concept maps, also known as mind maps, offer a visual way to organize information. This type of layout places a central idea at the core, from which various related subtopics branch out. This visual structure helps you grasp the overall scope of a topic and understand the connections between its different parts. Concept maps are not limited to text; they can also include images and drawings. The visual approach is particularly helpful for seeing relationships between ideas and can cater to visual learners.
Comparison Charts
Comparison charts can be useful to pair off ideas or concepts against each other. They visually display the relationships between categories or characteristics and allow you to easily see differences and similarities.
These charts are valuable for comparing different theories, methods, or historical events, by placing these side by side to quickly spot the similarities and differences. Laying out all the different concepts or ideas next to each other makes it easier to retain the information and understand the specific nature of each category or characteristic.
Timelines
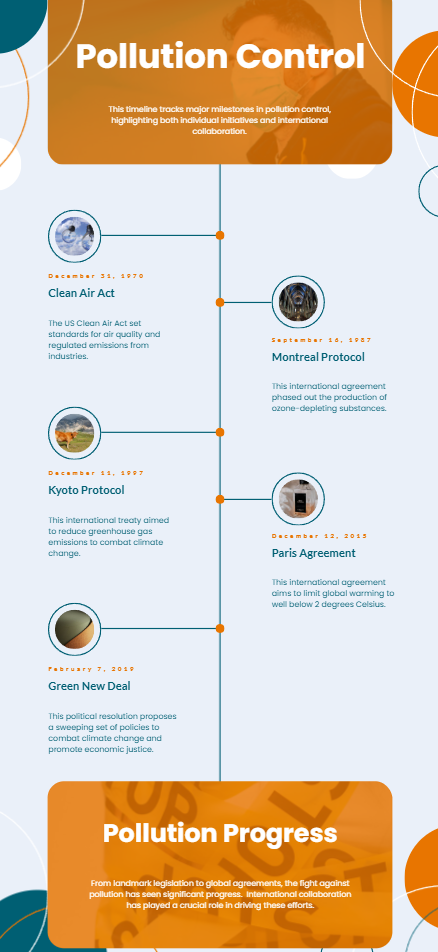
Timelines are an ideal way to organize information that is structured chronologically. Particularly useful for subjects like history, they visually represent events in the order in which they occurred.
By seeing the events in chronological order, you can better understand the context and relationships between them. The visual and sequential nature of timelines can be especially effective for learners who benefit from a chronological organization of information.
Concept Cards
Similar to flashcards, concept cards are effective for memorization and active recall. On the front of the card, you would place a key term or idea, and on the back, write the supporting details, examples, and summaries.
This method is perfect for reviewing definitions, formulas, or any other piece of information that needs to be memorized.
Process Maps
Process maps can be used to visually represent a series of steps in a procedure or system. You can visually show the flow of steps by creating a visual pathway or workflow, which also promotes a better understanding of any sequence of steps, stages, or phases.
These maps are not limited to text and can include diagrams or images to illustrate different parts of a process. This layout helps simplify complex procedures by clearly outlining each step. By being able to visualize the process, you’ll be able to understand it more thoroughly.
Making Study Guides for Visual Learners
If you’re a visual learner, you can use various techniques to transform your study guide into a more engaging and effective tool. Let’s explore how.
Diagrams
Diagrams are a visual learner’s best friend, since they can explain complex concepts and processes more effectively than text alone.
In a pollution control study guide, you could use a diagram to illustrate the different sources of pollution, showing how pollutants move through the environment. You can get creative on how to manifest visuals, as long as they simplify complex topics and highlight the connections between various components.
Images
Relevant images or illustrations provide visual cues that can help with recalling key facts. Whether it’s writing for our blog or studying a new topic, I like to use images in my notes to break up long blocks of text.
A simple image or illustration can really drive the point home. For example, you could include pictures of different types of pollutants or images that showcase the effects of pollution.
Color Coding
Color coding helps me to organize my thoughts. I use a different color for each topic, or I might highlight each key idea in a different colour.
You can use colour coding to highlight important terms, separate different topics or themes, mark areas that need more review, or to identify connections between related concepts.
Just make sure you stay consistent with your colour scheme. It’ll make the study guide more effective and memorable.
Visual Organization
Using lines, arrows, and shapes to visually connect ideas or group information can help visually structure your study guide. I like to draw arrows to connect different ideas, or use circles to group key concepts.
Tables
Tables can be used to quickly compare data or key points. A comparison chart can help you understand the differences or similarities between facts, theories, or processes.
Need some help creating charts that turn your data into a clear picture? Try our AI chart generator for free today.
Handwriting
Writing by hand slows down the information processing, allowing you to think more deeply about what you are transcribing, which can help with memory retention.
Studies have shown that handwriting increases memory retention. And I’ve found that handwriting can be more effective for visual learners, since I absorb and retain information more through visuals.
When you write by hand, you can easily include diagrams, symbols, or other personalized visual elements.
Common Mistakes to Avoid When Creating Study Guides
Avoid these common mistakes to make your study guides as effective as possible.
Information Overload
Don’t include too much information, which can lead to confusion. Summarise only the most important points and key concepts. Keep your study guide concise.
Disorganised Content
A lack of clear organisation can make your study guide difficult to use. Use headings, subheadings, and bullet points to keep things in order. Organise your notes in a way that makes sense to you, such as by date or by topic.
Passive Review
Avoid simply reading through your study guide. Engage with the material by incorporating practice questions, fill-in-the-blank exercises, or flashcards to test your knowledge.
Not Tailoring to Learning Style
Your study guide should be personalized. Consider whether you are a visual, auditory, reading/writing, or kinesthetic learner, and adapt the guide accordingly. Visual learners may benefit from colour coding and concept maps.
Waiting Too Long to Create a Study Guide
Do not wait until the last minute. Start making your study guide as soon as you can, ideally after each class, so you can build it up over time.
Neglecting Visual Elements
Failing to use visual aids will make the study guide less engaging. Visual aids such as diagrams, charts, timelines, concept maps, and colour-coding break up text, making information easier to remember.
Not Using Active Recall Methods
Don’t just read your guide. Add practice questions, fill-in-the-blank exercises, or create flashcards to test your knowledge actively.
Inaccurate Information
Verify the accuracy of your information by comparing your guide with classmates’ notes, textbooks, and asking your teacher, if needed.
Not Adapting the Guide
Be prepared to adapt your study guide as you learn new information or discover better ways of organising it.
If creating a study guide from scratch still feels a little overwhelming, consider using an AI study guide generator to take the hassle out of the process. With an AI tool, you can receive an outline to help you organize your thoughts and the topics you need to tackle. Try our AI Study Guide Maker and let the AI design the outline for you.
By using effective study techniques, you can achieve better learning outcomes. Remember, a well-made study guide is your secret weapon for success in your studies.
